Pages

Thursday, January 27, 2011

Let's make Whoopie!

We all know that Valentine's Day is coming up so why not turn something round into a heart?!?  With a little extra time and effort you can make heart shaped whoopie cookies.  They turned out really cute and the kids love them!

Here's what I did (recipe at bottom of post):

After the dough sat in the fridge overnight (because we ran out of the time the night prior) I used powered sugar to "flour" my rolling pin.  I took a little out at a time and flattened it on the parchment paper then used a heart shaped cookie cutter.  After I laid them all out on the sheet I dusted them with powered sugar.

After they baked and cooled I used a pastry bag to put the filling on one inside of the cookie.  Make sure you have a lot so it goes to the edges when the two cookies are closed.

 Press the cookies together but not all the way.  You want to leave some space between the two.

Lightly press the edges into sprinkles or your choice of decoration.

Indulge! 


 To go along with the heart theme we had heart shaped French Toast for dinner.  I only do this on nights my husband is out of town.  The kids love it!


Whoopie Cookies

Cookies:
1 3/4 flour
1/2 cup Dutch-processed cocoa powder (I used natural b/c I had it on hand)
1/4 tsp salt
1 cup sugar
3/4 cup (1 1 /2 sticks) butter, room temp
1 egg

Filling:
1 cup plu 2 TBL powdered sugar
3/4 (1 1 /2 sticks) cup butter, room temp
1/2 tsp vanilla extract
sprinkles or your choice of decoration

1. Preheat oven to 350 (do not preheat until after your dough has chilled and you are ready to actually bake!).   Line two baking sheets with parchment paper.
2. In medium bowl, whisk flour, cocoa and salt together.
3. In a standing mixer bowl beat sugar and butter together until light and fluffy.  Add egg and mix well.
4. Add dry ingredients into butter mixture and beat until blended.  Refrigerate the dough for an hour or longer.
5. Using dough, scoop 1 tablespoon of dough out and roll into smooth balls.  Place the balls onto the parchment paper at least 2 inches apart.
6. Using the bottom of a flat glass, flatten each ball of dough into a 2-inch round circle.
7. Bake until they do not look wet, or for about 11 minutes.
8. Cool on tray for 5 minutes then cool completely on rack.
9. For filling: place the butter in a standing mixer bowl and beat until smooth.  Add powder sugar and beat until blended well.
10. To assemble: Spread 2 heaping teaspoons of filling evenly over flat side of 1 cookie to edges.  Top with another cookie.
11. Roll cookies in sprinkles or other decoration.

This recipe is adapted from the www.kidscookingco.com.  We made these over Christmas there with peppermint filling and rolled in crushed peppermint.

monogram

giveaways
The Girl Creative


Wednesday, January 26, 2011

How to change the font on your blog

I always wanted to change the header font on my blog but never knew how.  I love fonts but the default fonts on blogger are so boring.  I discovered a new website, well new to me, http://www.junelily.com/ and she has a link to a blog with a tutorial on how to change the font.  This blog http://www.kevinandamanda.com/ has such great ideas and fun fonts you can download.  If you haven't checked it out yet you should.  I'm not gonna lie, this was quite time consuming.  I installed and it didn''t work for me so I had to redo it.  I left off a word in the html jargon but alas I have a new font on my blog!  Who knows maybe I'll mix it up again soon.

Happy Hump Day!

Tuesday, January 25, 2011

Shadow Box Display

This past summer my husband and I went to Exuma, Bahamas with some friends.  It is one of the prettiest islands I've ever been to.  You should go if you ever get the chance.  There is a sandbar we checked out while boating one day.  The guys were able to bring back quite a few sand dollars.  I'd never seen any this big before.  I actually found one myself.  It's one of the smaller ones.  I knew right away that I was going to display them in our guest bathroom where I have a painting we picked up in Maui on our honeymoon.  We sort of have a beach theme in there now.  I went to Hobby Lobby and picked up a shadow box and matte board.  I used a paper cutter here at home to cut the board down.

I chose four sand dollars to mount to the board, two smaller and two larger.


 My supplies - shadow box, matte board, sand dollars & epoxy (not pictured)


Mixing the epoxy.

I laid them out how I wanted them.

Then put the glue around the edges and wiped away the messes.

Here's my shadow box hanging in the bathroom.

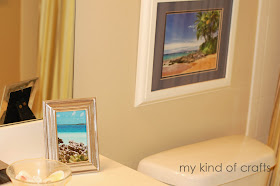
Just so you know there's color in there, it's hanging across from this!  On the counter is a photo I took in Exuma and shells we have collected from various Caribbean islands.  I'm going to enlarge another photo I took and hang it to the right of the shadow box.

giveaways

Monday, January 17, 2011

Chocolate Chips + Oats = Fun Treats!

Last week the kids and I decided to make cookies.  It had snowed here, finally, which meant we were pretty much stuck at home since Texans don't mix snow/ice and driving.  I pulled out the chocolate chips and noticed a recipe on the back for Milk Chocolate Oatmeal Cookies.  I'm not going to type out the recipe but you can click on this link to find it on Nestle's website.

*I did make my own revisions to the recipe.  I used 3/4 white flour and 3/4 whole wheat flour.  I also mixed the egg, milk and vanilla in a bowl together before I added to the combined ingredients (not sure if that makes a difference or not).  Lastly, I set aside about 1/2 of the chocolate chips.  After I rolled the dough into balls I placed two to three of the chocolate chips on top of the dough balls.  This gives the cookies a nice extra chocolate appearance.


Treat #1 - Cookies and milk

My daughter and I thought it would be fun to make a big cookie for daddy in the shape of a heart.  Could be cute for Valentines Day!

Next time I won't make the point so close to the edge of the pan.
Treat #2 - Heart shaped GIANT cookie


Treat #3 - Ice Cream Cookie sandwich rolled in mini chocolate chips

Treat #4 - Cookies with Vanilla Ice Cream (Blue Bell, of course) drizzled with mini chocolate chips


My daughter - All done!


Localfunforkidsfriday

Thursday, January 13, 2011

Chicken Pot Pie

I love chicken pot pie, especially during the winter.  It's a perfect week for chicken pot pie here since it snowed and all!  Another reason why I love chicken pot pie - my kids will actually eat vegetables.  This is a yummy recipe that is pretty simple.  You can doctor it up any way you'd like to your family's preferences.

Here's the original recipe given to me:
1 5oz can & 1 10 oz can of Hormel Breast of chicken - I always cook two breasts in the oven...none of that canned stuff in my house!
1 TBL butter
1 can cream of mushroom (98% fat free)
1 can cream of chicken (98% fat free)
1/2 cup milk
1 can green beans, drained
1 can carrots, drained
1 can corn, drained
1 cup frozen shredded potatoes (hash browns)
1 box Pillsbury All Ready Pie Crust
salt & pepper to taste

Directions:
Preheat oven to 425 degrees.  Stir everything together in a pot and heat for 20-25 min. on med. heat.  Stir occasionally.  Spray pan (round or 11X7) with cooking spray.  Put one pie crust on the bottom.  Pour mixture onto crust.  Put remaining crust on top of mixture.  Poke with fork.  Bake for 25-30 minutes, or until golden brown.

My favorite extra ingredient:

I've added rosemary before and tried all kinds of different spices but this is the one I like the best.

Last night I tried to be fancy and lattice the top.  I found that I'm not fast enough with my lattice skills.  The dough was getting too hot on the mixture before I could get all the pieces lined up.


Enjoy!

giveaways