Read More http://www.kevinandamanda.com/whatsnew/tutorials/how-to-use-a-cute-font-for-your-blogger-post-titles.html#ixzz1CADyuDMP
Showing posts with label tutorial. Show all posts

Tuesday, April 19, 2011

Resurrection Rolls - Easter!

Easter is this week!  I love Easter and usually fill my kids with Eater treats, stories of Christ and traditions.  However, this year I've really fallen short.  I'm lagging in all things this year.  But, I was at a MOMS Connection meeting last Thursday and one of my sweet mom friends mentioned resurrection rolls so I came home and googled it.  I found this link and we did it right away!  It really is pretty simple and you probably have all the ingredients to do it.  I grabbed my Bible and we got started!

Here's what you need:
1 can of Crescent rolls
melted butter
cinnamon & sugar
Large Marshmallows

Preheat oven to 350 degrees.

Unroll the crescent rolls.  The rolls represent the cloth that Jesus was wrapped in.

Read Matthew 27:57-61
When it was evening, there came a rich man from Arimathea, named Joseph, who himself had also become a disciple of Jesus. This man went to Pilate and asked for the body of Jesus. Then Pilate ordered it to be given to him. And Joseph took the body and wrapped it in a clean linen cloth, and laid it in his own new tomb, which he had hewn out in the rock; and he rolled a large stone against the entrance of the tomb and went away. And Mary Magdalene was there, and the other Mary, sitting opposite the grave.


1. The marshmallow represents Jesus.  Give one to the children.
2. Have them dip the marshmallow into the melted butter.  The butter represents the oil of embalming.  
3. Now they'll roll the marshmallow in the cinnamon/sugar combination.  These represent the spices used to the anoint the body.
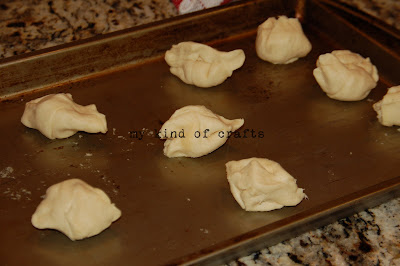
4. Now wrap the marshmallow tightly in the roll, seal the marshmallow inside.  This will represent Jesus' body being wrapped after death.
5. Place the rolls in the preheated oven for 10-12 minutes.  The oven represents the tomb.  Pretend it was three days.
6. Let the rolls cool.  After the rolls have cooled let the children open their rolls (cloth).  They'll discover he is no longer there!  He has risen! (The marshmallow has melted and the roll has puffed up)


Read Matthew 28:5-8

The angel said to the women, "Do not be afraid; for I know that you are looking for Jesus who has been crucified. He is not here, for He has risen, just as He said. Come, see the place where He was lying. Go quickly and tell His disciples that He has risen from the dead; and behold, He is going ahead of you into Galilee, there you will see Him; behold, I have told you."
And they left the tomb quickly with fear and great joy and ran to report it to His disciples.


The angel said to the women, "Do not be afraid; for I know that you are looking for Jesus who has been crucified.

You can go on to explain that he had risen from the dead, that no one had taken his body.  He appeared in person to Peter, the 12 disciples, and then to more than 500 people.  Rising from the dead proved he was the Messiah.


May you have a blessed Easter with your loved ones!


Tuesday, April 12, 2011

Make a Rainbow with your Kids

Have you ever wondered how to make a rainbow with your kids?  Here's an easy way to make one in your kitchen!  All you need is glasses, water, food dye and a spoon.

Step 1: Line up six glasses and fill every other glass about half full with water.
Step 2: In the first glass put 3 drops of red food dye and stir.
Step 3: In the third glass put 3 drops of yellow food dye and stir.
Step 4: In the fifth glass put 3 drops of blue dye and stir.
Step 5: Pour a little of the red and yellow into the second glass and you get orange.
Step six: Pour a little of the yellow and blue into the fourth glass and you'll get green.
Step seven: Pour a little of the red and blue into the sixth glass and you'll get purple.

Lastly,you can pour a little of each color into another glass and you'll get brown.

Now you've made a RAINBOW!


Now if it would just rain outside we could try and find a real rainbow.  I really want to capture a rainbow on film or memory stick. ;)


Wednesday, January 26, 2011

How to change the font on your blog

I always wanted to change the header font on my blog but never knew how.  I love fonts but the default fonts on blogger are so boring.  I discovered a new website, well new to me, http://www.junelily.com/ and she has a link to a blog with a tutorial on how to change the font.  This blog http://www.kevinandamanda.com/ has such great ideas and fun fonts you can download.  If you haven't checked it out yet you should.  I'm not gonna lie, this was quite time consuming.  I installed and it didn''t work for me so I had to redo it.  I left off a word in the html jargon but alas I have a new font on my blog!  Who knows maybe I'll mix it up again soon.

Happy Hump Day!

Tuesday, January 25, 2011

Shadow Box Display

This past summer my husband and I went to Exuma, Bahamas with some friends.  It is one of the prettiest islands I've ever been to.  You should go if you ever get the chance.  There is a sandbar we checked out while boating one day.  The guys were able to bring back quite a few sand dollars.  I'd never seen any this big before.  I actually found one myself.  It's one of the smaller ones.  I knew right away that I was going to display them in our guest bathroom where I have a painting we picked up in Maui on our honeymoon.  We sort of have a beach theme in there now.  I went to Hobby Lobby and picked up a shadow box and matte board.  I used a paper cutter here at home to cut the board down.

I chose four sand dollars to mount to the board, two smaller and two larger.


 My supplies - shadow box, matte board, sand dollars & epoxy (not pictured)


Mixing the epoxy.

I laid them out how I wanted them.

Then put the glue around the edges and wiped away the messes.

Here's my shadow box hanging in the bathroom.

Just so you know there's color in there, it's hanging across from this!  On the counter is a photo I took in Exuma and shells we have collected from various Caribbean islands.  I'm going to enlarge another photo I took and hang it to the right of the shadow box.

giveaways

Wednesday, December 1, 2010

Advent Calendar

I started reading an Advent book with my daughter a couple years ago.  Last year I decided I wanted to find a cute calendar to put trinkets and stuff in for the kids.  Well, I looked online and found a cute one but waited too long and decided to wait until the next year which would be now!  I searched etsy and found lots of cute ones but then realized I could make one myself.  Of course I waited until the week of Thanksgiving to get started and just finished it today.

First, I bought a new mini muffin tin (because I will be using the one I already have during this time period) with my 40% off coupon at Hobby Lobby.
Next, I cut out squares in four different Christmas prints.
Then I cut out smaller squares of red, green and white card stock followed by a Christmas sticker.


I started with number stickers and decided I didn't like them so back to Hobby Lobby I went to buy number stamps.  Before I stamped them all I attached magnets to the top and bottom of each square.  I bought the magnet roll at Hobby Lobby for $2.99.


I decided after I had already attached the magnets that I wanted to protect them so I could use them again next year.  The best thing I could come up with was to cover each square with packing tape.  Had I started my whole project earlier I would have taken them to Kinko's and had them laminated.  But, this works.


The finished calendar!

Some daily examples are:
2 Hershey Candy Cane Kisses
2 Chocolate Kisses

Activities to do:
Make Christmas cookies
Take treats to a neighbor
Make a Christmas card for a teacher
Make a Christmas card for a friend
Do a Christmas craft
Make a handprint Santa
Listen to Christmas music
Learn the song "The Three Wise Men"

Scriptures:
Joseph would care for Mary while she was pregnant. Matthew 1:24-25
Lots of angles joined in praising God! Luke 2:13-14
The wise men again found the guiding star. Matthew 2:9-10


Merry Christmas!  Happy Advent!

Wednesday, October 13, 2010

Candy Corn Treats


What to do with all those candy corns?!?  Why not add some candy corn sweetness to your next batch of Rice Krispie Treats!


I sort of followed the recipe on the box.  Here's what I did:
5 TBS butter
4 cups mini marshmallows + 1 cup jumbo sized (I ran out of mini)
5 cups Rice Krispies
2 cups candy corn

1. Melt the butter in a pan over low heat.  Add marshmallows and stir until melted.  Remove from heat.
2. Stir in the Rice Krispies.  Once they are coated well stir in the candy corn.
3. Use wax paper to press down evenly into a 9X13 pan.


Serve and indulge within a couple days!


These make great little treats to pass out to friends and neighbors.  Stick them in a clear bag and tie with some Halloween ribbon and you have yourself a sweet little treat.  I must say, they are quite addicting.  Good thing we passed them out to the soccer team last night!!

Linking to:
Somewhat Simple
Shabby Chic Cottage
Tatertots and Jello


Monday, September 20, 2010

Candied Marshmallows

Yesterday we celebrated my daughter's 5th birthday.  One of the items I put in the favor bags was candied marshmallows made into lollipops.  I saw these in a candy shop and thought they'd be pretty easy to make. In fact, I didn't even do a trial, I just whipped them up on Friday!  Here's what you need to make them: Jet puffed marshmallows (go for the real stuff, not store brand), Wilton candy melts, sprinkles or decorating sugar, lollipop sticks, small clear bags, ribbon and wax paper.

1. Push the lollipop sticks all the way into the marshmallows and lay on wax paper.
2. Melt the wafers in a microwave safe bowl in 30 second increments, stirring between until melted.
3. Dip each marshmallow into the melted candy and then smooth the edges (I used a knife).
4. Immediately dip into your choice of decoration.
5. Lay on wax paper.
6. Once they are completely dry you can put the clear bag over the marshmallow and tie ribbon.

Easy, cute and yummy!


Linking to: